Home / PostsPost
CodeIgniter 3.0整合Doctrine2
![]() 嘟噜聪2015/05/30 16:21:25
6834人已阅
嘟噜聪2015/05/30 16:21:25
6834人已阅
简介 哈哈,我又来了,每周一篇,必不可少,这周当然也有一些小收获那就写下来吧。今天的主角当然是被我玩到烂的CodeIgniter框架啦,前几个月它刚更新成3.0版本了,然后我小体验了一下,与2.0版本变化不是很大,依然不审以轻量快速上手开发为主,它用在小项目上还是不错滴,虽然我已准备抛弃CodeIgniter框架了...
CodeIgniter 3.0整合Doctrine2
哈哈,我又来了,每周一篇,必不可少,这周当然也有一些小收获那就写下来吧。今天的主角当然是被我玩到烂的CodeIgniter框架啦,前几个月它刚更新成3.0版本了,然后我小体验了一下,与2.0版本变化不是很大,依然不审以轻量快速上手开发为主,它用在小项目上还是不错滴,虽然我已准备抛弃CodeIgniter框架了...
第一次接触 Doctrine 是在使用Syfmony框架时,当第一次用的时候感觉完全没办法适应,搞不懂它是怎么回事。用过一段时间过后发现...还是不懂( ̄▽ ̄)... 不得不承认,用过一段时间过后确实能发现它确实很方便慢慢得我也已经喜欢上它了,就像当初喜欢上 Twig 模版一样。有时候就是这么神奇,你越是搞不定或越有挑战的东西你超是喜欢,啊,人类真是一种难以琢磨的生物...
好了进入正题。。。
Doctrine是什么?
- 是一个ORM(Object-relational mapper),提供php数据库和PHP对象的映射。他和其他的ORM一样都是为了保证持久层和逻辑层的分类而存在的。
- 是一个ORM(Object-relational mapper),提供php数据库和PHP对象的映射。他和其他的ORM一样都是为了保证持久层和逻辑层的分类而存在的。
Doctrine2 配置需求
- PHP版本5.3以上 建议使用 PHP5.5 好处多多
- 建议使用 composer 安装
什么是Entity
- Entity是PHP的一个对象
- Entity对应的表需要有主键
- Entity中不能含有final属性或者final方法
Doctrine 它是一个独立的第三方扩展包,可以整合进很多框上上去。安装方法也很简单,使用几条命令基本主完事了。这是Doctrine的官网http://www.doctrine-project.org/可以去这里下载官方最新的包。这个是官方文档http://docs.doctrine-project.org/projects/doctrine-orm/en/latest/,还是那句话“具体的使用方法请参考官方文档”,我不生产Doctrine,我只是一名小小的搬运工。
哦对了,我之前写了一篇关于整合CodeIgniter + Twig模版引擎的的文章 《CodeIgniter 框架集成Twig模板引擎》 有兴趣的同学可以去看看,也超级简单。CodeIgniter + Doctrine + Twig 简直了,几乎可以从一个轻理的小型框架摇身一变,成了一个中小型框架了,是不是觉得很高端的样纸(^ω^)别给我提 ThinkPHP 太那什么了,我宁可用ci框架都不愿意使用ThinkPHP 〔今天在陪你咖啡点了一杯拿铁(平时我都是喝摩卡的,今天想换个口味)总感觉怪怪的,难道是我刚刚吃了大蒜的原因?〕哈哈。
唉。。。又废了好多话。。。
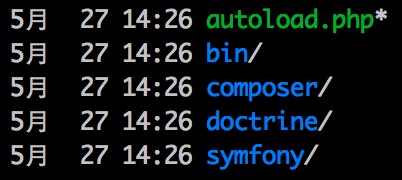
下载好包后解压会得到如图一些目录及文件我们把它放到 CI框架的 Application/third_party/Doctrine 目录 (没有third_party目录的话自己创建一个)
 然后在
然后在 Application/ 目录创建创建两个文件分别是doctrine 和 doctrine.php 还有 Doctrine.php
文件** doctrine **
 #!/usr/bin/env php
 <?php
 include('doctrine.php');
文件** doctrine.php **
 <?php
 /**
  * Doctrine for CodeIgniter
  *
  * @author  Latte Cake <latte@latteCake.com>
  * @link    http://lattecake.com
  */

 define('APPPATH', dirname(__FILE__) . '/');
 define('BASEPATH', APPPATH . '../system/');
 define('ENVIRONMENT', 'development');
 define('VENDOR_PATH', APPPATH . 'third_party/Doctrine/');

 chdir(APPPATH);

 include_once VENDOR_PATH . 'autoload.php';
 require __DIR__ . '/libraries/Doctrine.php';

 foreach ($GLOBALS as $helperSetCandidate) {
     if ($helperSetCandidate instanceof \Symfony\Component\Console\Helper\HelperSet) {
         $helperSet = $helperSetCandidate;
         break;
     }
 }

 $doctrine = new Doctrine;
 $em = $doctrine->em;

 $helperSet = new \Symfony\Component\Console\Helper\HelperSet(array(
     'db' => new \Doctrine\DBAL\Tools\Console\Helper\ConnectionHelper($em->getConnection()),
     'em' => new \Doctrine\ORM\Tools\Console\Helper\EntityManagerHelper($em)
 ));

 \Doctrine\ORM\Tools\Console\ConsoleRunner::run($helperSet);
接下来是最重要的 Doctrine.php 扩展文件啦
Doctrine.php 文件是在 Application/libraries/ 目录
<?php
include_once APPPATH.'third_party/Doctrine/autoload.php';

use Doctrine\Common\ClassLoader,
    Doctrine\Common\Annotations\Annotation,
	Doctrine\ORM\Tools\Setup,
	Doctrine\ORM\EntityManager;

/**
  * Doctrine for CodeIgniter
  *
  * @author  Latte Cake <latte@latteCake.com>
  * @link    http://lattecake.com
  */
class Doctrine
{

	public $em;

	public function __construct()
	{
		// Load the database configuration from CodeIgniter
		require APPPATH . 'config/database.php';

		$connection_options = array(
			'driver'		=> 'pdo_mysql',
			'user'			=> $db['default']['username'],
			'password'		=> $db['default']['password'],
			'host'			=> $db['default']['hostname'],
			'dbname'		=> $db['default']['database'],
			'charset'		=> $db['default']['char_set'],
			'driverOptions'	=> array(
				'charset'	=> $db['default']['char_set'],
			),
		);

		// With this configuration, your model files need to be in application/models/Entity
		// e.g. Creating a new Entity\User loads the class from application/models/Entity/User.php
		$models_namespace = 'Entity';
		$models_path = APPPATH . 'models';
		$proxies_dir = APPPATH . 'models/Proxies';
		$metadata_paths = array(APPPATH . 'models/Entity');

		// Set $dev_mode to TRUE to disable caching while you develop
		$dev_mode = true;

		// If you want to use a different metadata driver, change createAnnotationMetadataConfiguration
		// to createXMLMetadataConfiguration or createYAMLMetadataConfiguration.
		$config = Setup::createAnnotationMetadataConfiguration($metadata_paths, $dev_mode, $proxies_dir);
		$this->em = EntityManager::create($connection_options, $config);

		$loader = new ClassLoader($models_namespace, $models_path);
		$loader->register();
	}
}
好了这样就已经安装好了...
什么?就这样?
是的,就这样,就这么简单。
我擦擦...
然后接下来再Application/models/目录创建两个子目录分别是 Entity/, Proxies/ Entity就是用来存Entity实体的 Proxies是干嘛的,其实...... 我也不知道...表打我 (´・_・`)
这个东西我在GitHub 上有Demo 有兴趣的可以 clone 下来玩玩,哎〜 等等先 Fork 一下再Clone谢谢合作。GitHub地址: https://github.com/icowan/CI-3.0-Twig-Doctrine 这个是整合了 Twig和Doctrine的CodeIgniter 框架。
都完事后我们执行命令: php doctrine # 在目录 Application/ 下执行。它会显示Doctrine的一些命令及用法说明等,看不懂的自己去翻译。。。
大概是这样一些...

如果想知道怎么用的话可以在执行这些命令的后面加下 --help 参数,比如: # php doctrine orm:generate-entities --help 然后也会出现一些帮助信息...
下面我列出一些学用的命令:
  php doctrine orm:schema-tool:create // 生成数据表
  PHP orm:schema-tool:update --force --dump-sql //多线程更新数据表 打印SQL语句

  /** 算了 自己去玩吧 多自去研究,不要老让别人告诉你怎么做.... (其实博主就是懒,不要解释)*/
在Application/models/Entity/创建 Entity 实例对象User.php
哎呀~ 好麻烦 自己去写吧GitHub上有写...
<?php
namespace Entity;
/**
 * User Model
 *
 * @Entity
 * @Table(name="user")
 * @author  Latte Cake <latte@latteCake.com>
 */
class User
{
	/**
	 * @Id
	 * @Column(type="integer", nullable=false)
	 * @GeneratedValue(strategy="AUTO")
	 */
	protected $id;
	/**
	 * @Column(type="string", length=32, unique=true, nullable=false)
	 */
	protected $username;
	/**
	 * @Column(type="string", length=64, nullable=false)
	 */
	protected $password;
	/**
	 * @Column(type="string", length=255, unique=true, nullable=false)
	 */
	protected $email;
	/**
	 * @ManyToOne(targetEntity="UserGroup")
	 * @JoinColumn(name="group_id", referencedColumnName="id")
	 */
	protected $group;
	/**
	 * Assign the user to a group
	 *
	 * @param	Entity\UserGroup	$group
	 * @return	void
	 */
	public function setGroup(UserGroup $group)
	{
		$this->group = $group;
		// The association must be defined in both directions
		if ( ! $group->getUsers()->contains($this))
		{
			$group->addUser($this);
		}
	}
	/**
	 * Encrypt the password before we store it
	 *
	 * @param	string	$password
	 * @return	void
	 */
	public function setPassword($password)
	{
		$this->password = $this->hashPassword($password);
	}
	/**
	 * Encrypt a Password
	 *
	 * @param	string	$password
	 * @return	string
	 */
	public function hashPassword($password)
	{
		if ( ! $this->username)
		{
			throw new \Exception('The username must be set before the password can be hashed.');
		}
		return hash('sha256', $password . $this->username);
	}
	public function setUsername($username)
	{
		$this->username = $username;
		return $this;
	}
	public function setEmail($email)
	{
		$this->email = $email;
		return $this;
	}
	public function getId()
	{
		return $this->id;
	}
	public function getUsername()
	{
		return $this->username;
	}
	public function getEmail()
	{
		return $this->email;
	}
	public function getPassword()
	{
		return $this->password;
	}
	/**
	 * Get group
	 *
	 * @return Entity\UserGroup
	 */
	public function getGroup()
	{
		return $this->group;
	}
}
然后再创建用户组的Entity实体 application/models/Entity/UserGroup.php
<?php
namespace Entity;
use Doctrine\Common\Collections\ArrayCollection;
/**
 * User Group Model
 *
 * @Entity
 * @Table(name="user_group")
 * @author  Latte Cake <latte@latteCake.com>
 */
class UserGroup
{
    /**
     * @Id
     * @Column(type="integer", nullable=false)
     * @GeneratedValue(strategy="AUTO")
     */
    protected $id;
    /**
     * @Column(type="string", length=32, unique=true, nullable=false)
     */
    protected $name;
    /**
     * @OneToMany(targetEntity="User", mappedBy="group")
     */
    protected $users;
    /**
     * Initialize any collection properties as ArrayCollections
     *
     * http://docs.doctrine-project.org/projects/doctrine-orm/en/latest/reference/association-mapping.html#initializing-collections
     *
     */
    public function __construct()
    {
        $this->users = new ArrayCollection;
    }
    /**
     * Get id
     *
     * @return integer
     */
    public function getId()
    {
        return $this->id;
    }
    /**
     * Set name
     *
     * @param string $name
     * @return Group
     */
    public function setName($name)
    {
        $this->name = $name;
        return $this;
    }
    /**
     * Get name
     *
     * @return string
     */
    public function getName()
    {
        return $this->name;
    }
    /**
     * Add users
     *
     * @param Entity\User $users
     * @return Group
     */
    public function addUser(\Entity\User $users)
    {
        $this->users[] = $users;
        return $this;
    }
    /**
     * Get users
     *
     * @return Doctrine\Common\Collections\Collection
     */
    public function getUsers()
    {
        return $this->users;
    }
}
创建好后执行命令: #php doctrine orm:schema-tool:create 创建数据库表,当然前提是你必须连接好数据库.....
做好后打开 Application/controller/Welcome.php文件
  	 public function index()
     {

         /** @var  $userGroup Entity\UserGroup */
         $userGroup = $this->em->getRepository('Entity\UserGroup')->find(1);

         $name  = '111';
         $email = '111@lattecake.com';

         /** @var  $userInfo Entity\User */
         $userInfo = $this->em->getRepository('Entity\User')->findOneBy([
             'username' => $name
         ]);

         if( $userInfo )
         {
             throw Doctrine\DBAL\Exception\NotNullConstraintViolationException::unknownColumnType("{$name} 已存在");
         }

         $user = new Entity\User;
         $user->setUsername($name);
         $user->setPassword($name);
         $user->setEmail($email);
         $user->setGroup($userGroup);

         $this->em->persist($user);
         $this->em->flush();
         $this->twig->render('welcome_message.html', [
             'user'       => $user,
             'userGroup' => $userGroup
         ]);
     }
不信的话你可以试试,打开数据库查一下这条数据存不存在....是不是特别方便?哈哈哈哈哈哈哈哈
关于Doctrine的一些使用方法我后面会专门写一些关于Doctrine的文章,今天主要说的是把Doctrine整合进CodeIgniter框架里去,这里就不讲那么多了,要讲也讲不完(其实就是为了下次有东西可以写,不能一次性都写完,要不然下次以什么为主题写呢?嘿嘿~~)
好了,今天就写这了,晚上有朋友请吃饭,他们要离开北京了,最后的晚餐...就先这样吧,下周继续....
The end!
很赞哦! (2)
上一篇:一个刷脸测年龄的小工具
下一篇:Twig模板引擎的基本使用
文章评论
点击排行
本栏推荐
标签
站点信息
- 微信公众号
